Monday, July 30, 2012

TRI-SHUTTER CARD STEP BY STEP INSTRUCTIONS

Greeting folks. Since I posted the tri-shutter card that I made my niece (July 25th), I have been contacted by many of you looking for instruction on how to make your own card like this. Unfortunately, we have had three days of rain here in Massachusetts so I have been unable to take pictures. But it is BEAUTIFUL today so here we go...
I usually start out with a 12x6.5 piece of cardstock because this size works great with most of the paper piece pattern set that I use.  I have done smaller cards, but really like this size the best. 
Holding the card stock horizontally, you will want to score at 2 inches, 4 inches, 8 inches and 10 inches. If you do not have a Scor-pal, Martha Stewart score board or other scoring means, you can always do it the old fashion way by drawing a line and folding at each of these marks.
This is way your card stock will look like once scored and folding.
Next, place your card stock vertically. You are now going to score the long way at the 1.5 inch mark. YOU WILL ONLY WANT TO DO THIS BETWEEN THE FIRST FOLD AND LAST FOLD ~ between the arrows. The card will look more professional if done this way. but if accidentally you do it the whole length of the paper, it is not a big deal.
Once this is done, turn the card stock and do the other side at the same 1.5 inch mark. Now you will have one on each side. Now cut along those lines, REMEMBER TO ONLY CUT BETWEEN THE FIRST FOLD AND LAST FOLD.
                   This is what the card will look like from above.
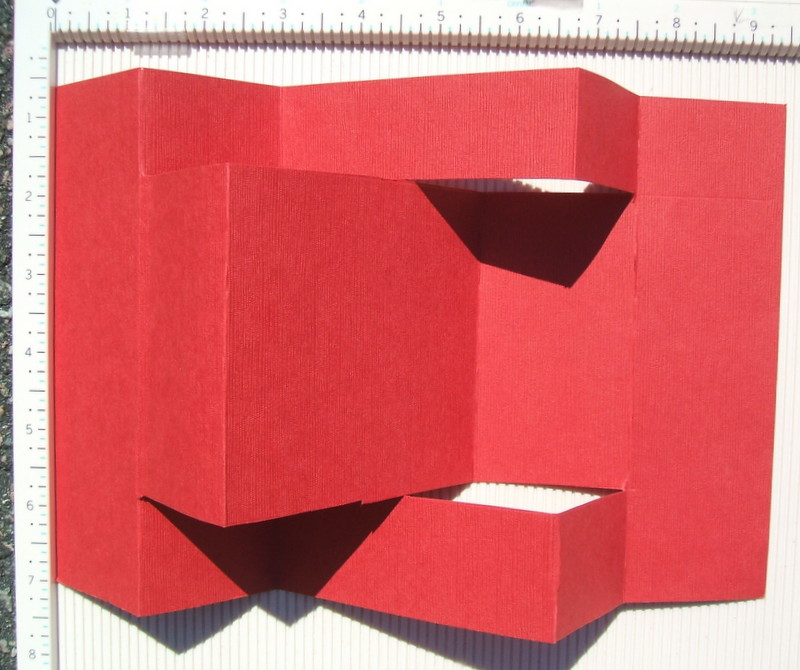
Now, to get the 'cool' looking fold to this card you will want to do a 'mountain' - 'valley' fold on the top and bottom thirds. This is how the card will look when laying flat.
 This is what the card will look like from above when finished. This is the base of a tri-shutter card. Then you can embellish it as you wish. Here are some examples of cards I have done in the past...
Thanks so much for looking and showing an interest in this card style. If any of you have questions please feel free to contact me. Good Luck.

Thursday, July 26, 2012

GET WELL/CHECK UP

How cute is this newest set from Designs on Cloud 9? I just love it. 'Get Well' cards are my most favorite cards to make so getting this set was a MUST!!!
Here is page one complete with pill bottle, pills, thermometer, and eye/ear light scope. I also created the flowers from the 'fancy flower' set from DC9.
This page 2 has a great stethoscope, shot, and 'knee banger' (I think that is the technically medical term for that device.).
                  How adorable is this cutie holding the chest xray?
                   I can only hope that my next nurse is this cute!
                    Again, how cute is this bear holding the EKG?
A huge thank you to Michelle for coming up with this set ~ I have been pestering her since I joined DC9 last September for this. :)

Wednesday, July 25, 2012

HAPPY BIRTHDAY BROOKE

I wanted to share a card that I made for my niece Brooke. She, like most of my family is a huge New England Patriot football fan.This is the card front laying flat.
                        Here is a close up of a cute cheerleader.
                         This is the middle of the front of the card.
                         Of course I had to include a football player.
                                 Here is the back of the card.
                            Here is a close up of the referee.
           Here is a picture of the coach. It kinda looks like Bill Belichick.
Here is the center of the back of the card. In the left corner is a penalty flag and a challenge flag in the right corner.
                                     Here is the card open.  
                                   The back of the card open.

Here is what the card looks like from above. Cool huh. My niece did get this card in the mail today and immediately sent me a text. She loved it :) Happy Birthday Brooke, sorry it was late. But I think it was worth the wait.

Tuesday, July 24, 2012

YOU MAKE MY LIFE SPARKLE

Hello again. I just wanted to share one more Independence Day project with you. The summer is moving so fast.
Here is page 1 of this two page scrapbook layout. All the photo mats and borders are machine stitched. Both pages also have a pull out photo mat. 
 Here is page 2. I love how the 'sparkle' part of the title came out. I added silver stickles to the bare chipboard letters and then outlined them with blue stickles. They really sparkle!
How darling are these two in their fabric patriotic dresses? Each bear is hand torn by me, and made from multiply layers of mulberry paper. 
 Here is a close up shot of the pull out mat/tag on page 1.

            Here is a close up of the boy holding his sparkler on page 2.
                             This is the pull out mat/tag on page 2.
I hope everyone is having a great summer. Take time to enjoy it, before long the kids will be back to school, Halloween will be here and then Christmas!!!

Monday, July 23, 2012

I'M YOUR BIGGEST FAN

This is my very first single page scrapbook layout ever. I have been wanted to attempt these for months now and finally got up the courage to try.
Even though this is only one page it has a lot going on...It contains SIX different pattern sets from Designs on Cloud 9. The base of this page is made from the 'scallop set'. I also used the 'basic bear', the fan from the 'biggest fan card', flower #8 from the 'fancy flower', the sara swirl (underneath the flowers) and the 'photo mat fun' pattern sets.
                                Here is a close up of the title.
The two photo mats are stitched with decorative stitching and has ribbon attached but not glued down so pictures can easily be slid underneath. How great is this paper huh?
    Here is a close up of the bear with the ribbon under his chin.
    Here is a shot of the same bear with the ribbon on top for a more girlie look.
 And of course a picture of the bear 'naked' with no bow at all.
How gorgeous is this flower? It took some time to make, but so worth it!
I made this yellow flower just a little bit smaller than the blue one. I love the shine of it. So pretty!
Here is a side shot to show the 3D effects. I used foam tape under the buttons on the fan. This picture really shows how the flowers pop! Thanks so much for look. Please feel free to leave me comments. I love reading them. Have a cool day!