Thursday, December 13, 2012

CANDLE CENTERPIECES

Hello again. I wanted to share this cute, quick project that I made two nights ago. I actually made it while watching 'Santa Clause 3'. I just hot glued 11 candy canes to one white candle. Then I attached 8 roses where the candy and candle meet. I made the flowers using the 'curly flower' pattern set from Designs on Cloud 9.
I then tucked in different color green paper pieces from the Martha Stewart branch punch.
To finish them off I just added a green simple ribbon around the middle. I thought the ribbon added just the right amount of color to each piece.
Thanks so much for looking. Come back tomorrow for some more great holiday ideas.

Saturday, December 8, 2012

CHRISTMAS BLOG HOP


Hello and welcome to my blog. If you are brand new, I am glad to have you. Most likely you have just come from Christine's blog. If you are here by accident, this is a complete list of the hop so you can start from the beginning...


Ashley - http://thebloghopprincess.blogspot.com
Marji - http://www.fstampaholic.blogspot.com/
Beth- http://motherandaughterdesigns.blogspot.com/
Cindy- http://www.cindys-greencricut.blogspot.com/
Teresa- http://freshandrenewed.blogspot.com/
Paula - http://preciouspagesbypaula.blogspot.com/
An'Jenic-http://anjenicgibson.blogspot.com/
Sandy - http://simplycraftycreationsbysandys.blogspot.com/
Sam- http://scrappingwithpirkie.blogspot.com/
Elaine - http://ExpressionsByElaine.blogspot.com
Christine- http://hotberrydesigns.blogspot.com/
Amanda - http://a-prata-design.blogspot.com
Liz Mullen- http://scrapiliciouslife.blogspot.com
Jearise - http://lorbysworld.blogspot.com
Anita~ http://www.anitaandbugs.blogspot.com

Here is my project:

My Christmas card features the 'stuffed stocking' pattern set from Designs on Cloud 9.
I actually used foam tape under the red on the candy canes for a 3D effect. The bear is made of several layers of mulberry paper. The whole paper piecing has been inked or chalked. I also machine sewn the card front using a decorative stitching. Thanks so much for looking. I hope you all have a great Christmas. Now onto your next stop...http://scrapiliciouslife.blogspot.com

Friday, December 7, 2012

VISIONS OF SUGAR PLUMS

Here is a holiday layout that I have created. It features the 'sugar plum fairies' patterns set from Designs on Cloud 9.
                                                     Page 1
                                                    Page 2
I love the colors in this layout. There is something about greens, purples and pink. Maybe because they are not the traditional red, green and white. I embellished the title as well as the sugar plum with glitter glue and tiny glass beads.
I embellished the gum drops with glitter glue and Martha Stewart chunky glitter.
                   She is so cute. My most favorite of the set.
Here is a close up picture of the mat paper. I used a Martha Stewart border punch to create the hearts. Each mat was machine sewn with decorative stitching. I am so happy with how these came out.

Thanks again for looking.  I am continuing to work on my Christmas cards. I have 10 started and think I might change the design because they are being more time consuming than I thought they would be. They are cute, but taking forever to get done and I am afraid to run out of time. So stay tuned.

Thursday, December 6, 2012

MY FIRST CANVAS

        Hello folks. I am so excited to share my first canvas with you all.
      I had sooooo much fun doing this. It was so involved and artsy.
It has paste, paint, mediums, stamps, rub ons, shaved ice, faux fur, and bakers twine.

             I carried the techniques on both sides of the canvas.
Here is a close up of the woman's face. I love how the word 'auntie' is shown on her neck. It was totally unplanned, but one of my favorite features of this piece.
This little one is another part of this that I love. He looks just like my 18 year old long haired dachshund. (Although, my son would never wear boots!!!)
 
Thanks so much for looking. I can not wait to start on my next canvas ~ there is just something about getting so messy and covered in paint, glitter, glue etc. haha


Sunday, December 2, 2012

ELF ON THE SHELF


Happy December 2nd. Do you have an elf on the shelf? This two page scrapbook layout was created with the pattern set from Designs on Cloud 9.

Here is page 1, which shows the title that has been embellished with stickles. There is also one cute Elf hanging on a Christmas ornament.

There are two more cuties on page 2. I think they are so cute. I just love how they came out.
 
Here is a close up. You can see that I used a Martha Stewart border punch on the background as well as the photo mats.
 
I added a red button on the coffe mug for dimention and again a bottom border using the MS punch.
            Here is an Elf on a shelf with a pepperment stick. Yummy.
Here is a close up of the photo mats. If you look close you can see that this paper as well as the other two border papers are embossed glitter paper. They are so pretty to look at but do not photograph well at all. The ribbon I used on the mats is my most favorite. It seems every year I get 3 or 4 spools of it and use it all up. It just gives such a country Christmas feel with the brown mixed in with the red and green.
Thanks so much for looking. I hope to have some more great Christmas projects coming you way soon.

Saturday, December 1, 2012

ADVENT CALENDARS

YIKES, it's December 1st already...The last few weeks I have been working on a couple of different advent calendars. The first one is from Designs on Cloud 9.
I love how the center showcases special items like a snowy tree, wooden nutcracker or glittery snowflake. The tear bear I made using the Designs on Cloud 9 pattern titled 'Bear Clauses'.
 There are 24 drawers that are on the outer edge. These little drawers measure 1inch by 1 inch. Yes, these are very small to fill, but perfect for all the best things in life...(love notes, small chocolates, money, or diamonds~like diamond earrings, diamond bracelet, diamond necklace, or diamond ring.)
I also made two other advent calendars from SVG CUTS. Unlike the first calendar, this one has doors instead of draws that pull out. What I like about this version is that the door sizes are different, some are easy to fill while others are a bit challenging. Still fun to fill.
I made one of these several years ago for my sister who is a master seamstress. I filled it with all sewing notions like safety pins, buttons, thread, zippers, little scissors etc. I am not sure which was more fun making the calendar or filling it. (I felt like I was on a scavenger hunt looking for things that would fit to match the sewing theme.)
These two that I made are for two special little girls in my life. It was so fun filling these too with rings, lip gloss, hair things etc. I even found two tone lucky rabbit feet for each calendar. (They are going to freak when they open those doors.)
 Here is a close up of one.

Here is the other one, this pictures shows you better the idea of the doors opening. How cool huh? I hope they both love their advent calendars. Now if you got one, go see what is behind Day #1.

Thursday, November 29, 2012

HAPPY BIRTHDAY POSSIE

I just wanted to share one more birthday post before moving on to Christmas Craziness. Last Saturday was my Mom's 77th and I made her a banner with her name on it as well as a Birthday card. Lets start with the banner...
I apologize for the poor pictures of this...I totally forgot to take some while it was still in my studio.
                 I used the set from Designs on Cloud 9 titled Banners 1.
I went with the star background in deep purple. Then the middle layer was a few shade lighter and finishing with the letters being made of a pearlized purple paper. I found this matching purple ribbon at Michael's.
Now onto the card...
I went with a concertina card. This was the first time that I used 4 single sided sheets of paper to make this card. In the past I have always used two two sided sheets so this was a bit of a challenge.
This is the back of the card. I used the matching pearlized cardstock for the letters on the card that was also used on the banner.
And once again...here is a picture of my assistant sleeping on the job. (His eye is right abouve the 'D'.)
Happy Birthday Possie. Hope it was a happy one.

Tuesday, November 27, 2012

HAPPY BIRTHDAY ALEC

Hello again. I wanted to share a quick birthday card I recently made for my nephew Alec. (His birthday was earlier this month...I am still playing catch up with photos and my posts since my equipment malfunction.)
I made this easel card using awesome Star Wars paper that I found at Joann's. I used a Martha Stewart border punch on the outer edge.
This is the card front. I used silver stickles on the 'yoda' title as well as the light stick. I love how cool this looks. Yoda actually looks like he is embroidered but it is just paper.
This is the card when fully opened. The 'happy birthday' was used from Designs on Cloud 9 patterns set titled Card Sentiments 1 .
Thanks so much for looking. Come back tomorrow when I will feature more birthday fun...

Thursday, November 15, 2012

HAPPY BIRTHDAY KAILYN

Here is yet another yummy treat that I want to share with you. This is a cake that I made for my cousin's daughter's birthday. She wanted an Ariel cake. So I created this cake along with matching cupcakes. The cupcake toppers are Ariel princesses that I made using the Designs on Cloud 9 'Pretty Princesses Set 2'.
This is a picture of the back of the toppers. 
 Here is a close up of the cake...eeekkk I had no idea that it was so blurry. Sorry.
Happy birthday Kailyn. I had a blast at your party. I hope you enjoyed the yummy cake :)

Wednesday, November 14, 2012

YUMMY COOKIES FOR CHRIS

I can't wait to share this yummy project I created for my nephew's birthday.

I made this box using the Designs on Cloud 9 pattern 'Cookies for Santa 3D Set'.
The mustache paper is actually wrapping paper from The Paper Source. I used bakers twine to attach a birthday card. The card was made also using a DC9 pattern 'Mister Mustache'.
 I filled the box with 6 different types of sugar mustache cookies. They came out soooo good. I just love a frosted sugar cookie!!! I hope you had a great birthday Chris :)

Monday, November 12, 2012

ONE LAST HALLOWEEN CARD FOR THIS YEAR

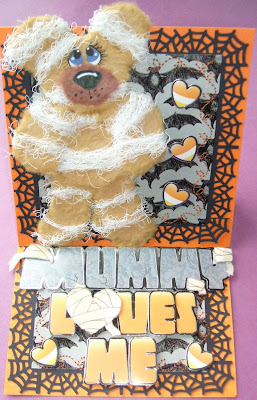
This is an easel card I made for my Mother for Halloween. This is the card front. I love the Martha Stewart bat paper. The spider web was created with a Martha border punch. The bear is made of multiply layers of mulberry paper. I used actual medical dressing left over from my debridement surgery.
                                This is the card when opened.
   Here is the card when displayed on its easel. Thanks for looking.